📐 模型
简介
指定游戏使用哪一个物品模型进行渲染,并且指定各个着色索引使用的颜色。
items:
  default:topaz_pickaxe:
    model:
      type: minecraft:model # 在这种情况下 type 是可选的
      path: minecraft:item/custom/topaz_pickaxe
      generation:
        parent: "minecraft:item/handheld"
        textures:
          "layer0": "minecraft:item/custom/topaz_pickaxe"
提示
如果你不指定类型,它将默认使用 minecraft:model。
着色
在本配置中,我们为自定义树叶创建了一个模型。但原版游戏中的默认树叶模型是没有颜色的,因此我们需要配置一个颜色提供器来为其着色。
default:palm_leaves:
  model:
    type: "minecraft:model"
    path: "minecraft:item/custom/palm_leaves"
    generation:
      parent: "minecraft:block/custom/palm_leaves"
    tints:
      - type: "minecraft:constant"
        value: -12012264
信息
需要颜色的地方支持使用十进制或 RGB 格式
value: 16711680
value:
  - 255
  - 0
  - 0
# 或
value:
  - 1.0
  - 0.0
  - 0.0
value: 255,0,0
# 或
value: 1.0,0.0,0.0
minecraft:constant
type: "minecraft:constant"
value: -12012264
minecraft:custom_model_data
type: "minecraft:custom_model_data"
index: 0
default: -12012264
minecraft:dye
type: "minecraft:dye"
default: -12012264
minecraft:firework
type: "minecraft:firework"
default: -12012264
minecraft:grass
type: "minecraft:grass"
temperature: 0.5
downfall: 0.5
minecraft:map_color
type: "minecraft:map_color"
default: -12012264
minecraft:potion
type: "minecraft:potion"
default: -12012264
minecraft:team
type: "minecraft:team"
default: -12012264
提示
注意
在阅读本教程前,请先查看使用 BlockBench 创建模型
如何创建可染色模型
首先,创建一个带有灰度纹理的模型。
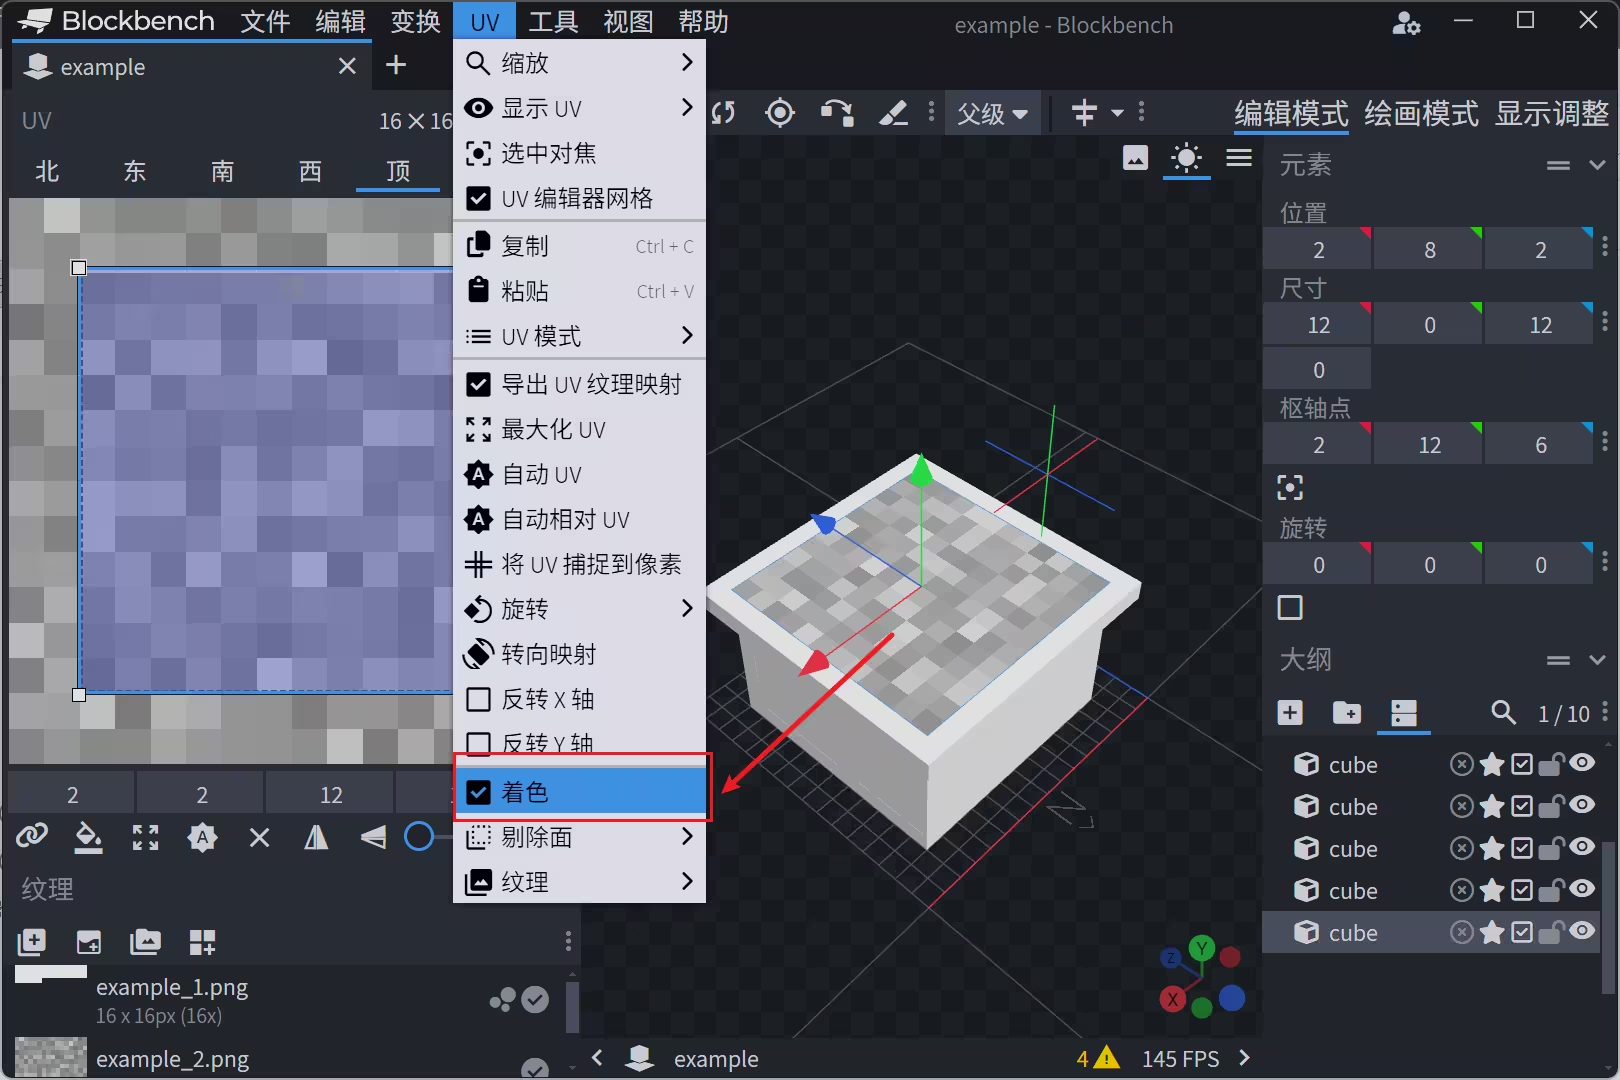
然后,在预览界面中点击需要着色的模型面,点击顶部工具栏的 UV 选项,找到并勾选 着色。
⚠️ 注意:必须在 预览界面 点击模型面,而不是在右侧面板中选择块,否则你找不到这个选项。

将所有需要着色的面都执行一遍相同的操作。完成后,导出模型文件,你会在对应的面上看到多出了一个 tintindex 属性。
{
  "format_version": "1.21.6",
  "credit": "jhqwqmc",
  "textures": {
    "0": "tints:block/example_1",
    "1": "tints:block/example_2",
    "particle": "tints:block/example_1"
  },
  "elements": [
    {
      "from": [1, 7, 1],
      "to": [2, 8, 15],
      "rotation": {"angle": 0, "axis": "y", "origin": [-6, 7, 10]},
      "faces": {
        "north": {"uv": [0.25, 0.25, 0.75, 0.75], "texture": "#0", "tintindex": 0},
        "east": {"uv": [1.25, 0.25, 1.75, 0.75], "texture": "#0", "tintindex": 0},
        "south": {"uv": [2.25, 0.25, 2.75, 0.75], "texture": "#0", "tintindex": 0},
        "west": {"uv": [3.25, 0.25, 3.75, 0.75], "texture": "#0", "tintindex": 0},
        "up": {"uv": [4.25, 0.25, 4.75, 0.75], "texture": "#0", "tintindex": 0},
        "down": {"uv": [5.25, 0.25, 5.75, 0.75], "texture": "#0", "tintindex": 0}
      }
    },
    ...
    {
      "from": [2, 8, 2],
      "to": [14, 8, 14],
      "rotation": {"angle": 0, "axis": "y", "origin": [2, 12, 6]},
      "faces": {
        "north": {"uv": [2, 2, 14, 2], "texture": "#1"},
        "east": {"uv": [2, 2, 14, 2], "texture": "#1"},
        "south": {"uv": [2, 2, 14, 2], "texture": "#1"},
        "west": {"uv": [2, 2, 14, 2], "texture": "#1"},
        "up": {"uv": [2, 2, 14, 14], "texture": "#1", "tintindex": 1}, // 可以看到这里额外多出了一个 tintindex 属性
        "down": {"uv": [2, 2, 14, 14], "texture": "#1"}
      }
    }
  ]
}
接下来,我们编写物品模型配置:
items:
  tints:example:
    model:
      type: minecraft:model
      path: tints:item/example
      generation:
        parent: "tints:block/example"
      tints: # 定义在 BlockBench 中勾选过“着色”的面
        - type: "minecraft:dye" # 第一个着色,对应 tintindex=0 的面(计算机从 0 开始计数)
          default: 144,80,62
        - type: "minecraft:grass" # 第二个着色,对应 tintindex=1 的面
          temperature: 0.5
          downfall: 0.5
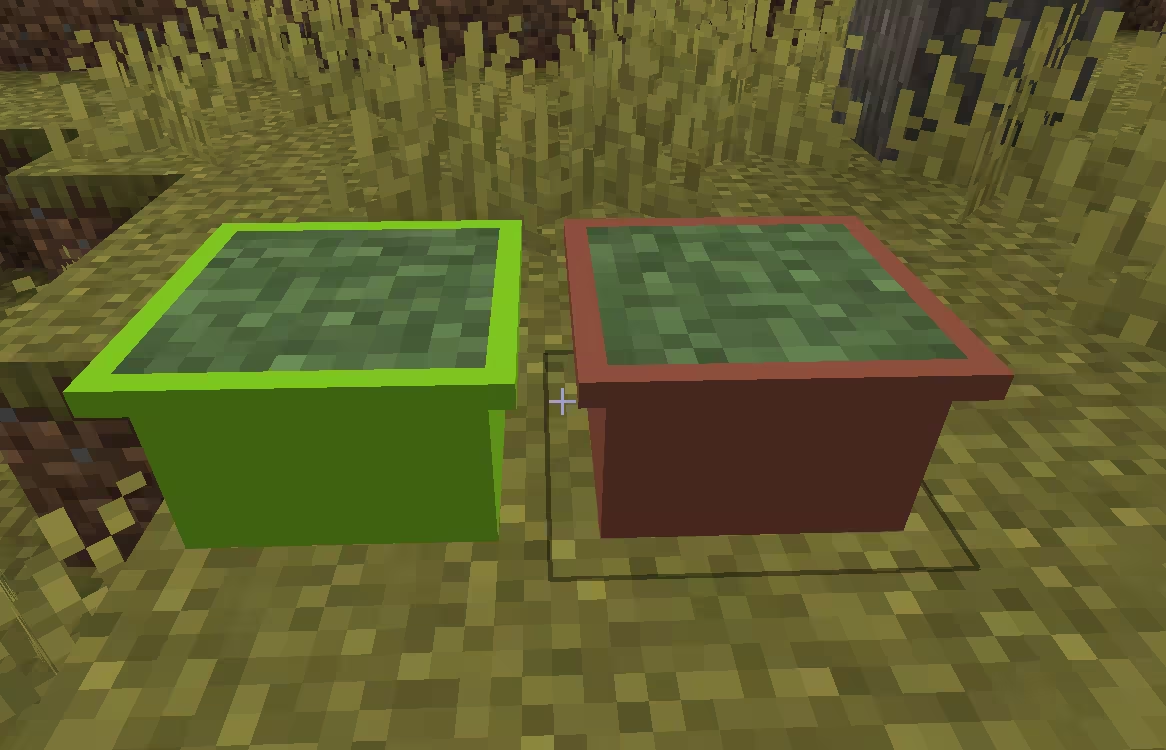
最后,你可以在此处下载完整示例包:点击下载 游戏内的效果如下所示:
